|
|
||
|---|---|---|
| .. | ||
| README.md | ||
| app.js | ||
| icon.js | ||
| metadata.json | ||
| waypointer.png | ||
| waypointer_screenshot.jpg | ||
| waypoints.html | ||
| waypoints.json | ||
| wp2_saved.jpg | ||
| wp2_screenshot.jpg | ||
README.md
Waypointer - navigate to waypoints
The app is aimed at navigation whilst walking. Please note that it would be foolish in the extreme to rely on this as your only navigation aid!
Please refer to the section on calibration of the compass. This should be done each time the app is going to be used.
The main part of the display is a compass arrow that points in the direction you need to walk in. Once you have selected a waypoint a bearing from your current position (received from a GPS fix) is calculated and the compass is set to point in that direction. If the arrow is pointing to the left, turning left should straighten the arrow up so that it is pointing straight ahead.

The large digits are the bearing from the current position. On the left is the distance to the waypoint in local units. The top of the display is a circular compass which displays the direction you will need to travel in to reach the selected waypoint. The blue text is the name of the current waypoint. NONE means that there is no waypoint set and so bearing and distance will remain at 0. To select a waypoint, press BTN2 (middle) and wait for the blue text to turn white. Then use BTN1 and BTN3 to select a waypoint. The waypoint choice is fixed by pressing BTN2 again. In the screen shot below a waypoint giving the location of Stone Henge has been selected.
The screenshot above shows that Stone Henge is 259.9 miles from the current location. To travel towards Stone Henge I need to turn slightly left until the arrow is pointing straight ahead. As you continue to walk in the pointed direction you should see the distance to the waypoint reduce. The frequency of updates will depend on which settings you have used in the GPS.
At the top of the screen you can see two widgets. These are the GPS Power Widget and the [Compass Power Indicator Widget]. These can be installed seperately and provide you a indication of when the GPS and Compass are switched on and drawing power.
Marking Waypoints
The app lets you mark your current location as follows. There are vacant slots in the waypoint file which can be allocated a location. In the distributed waypoint file these are labelled WP0 to WP4. Select one of these - WP2 is shown below.
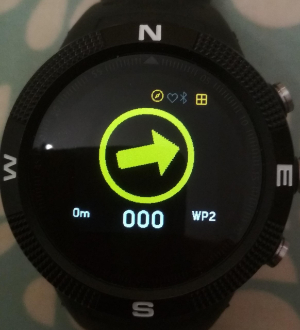
Bearing and distance are both zero as WP2 has currently no GPS location associated with it. To mark the location, press BTN2.

The app indicates that WP2 is now marked by adding the prefix @ to it's name. The distance should be small as shown in the screen shot as you have just marked your current location.
Waypoint JSON file
When the app is loaded from the app loader, a file named
waypoints.json is loaded along with the javascript etc. The file
has the following contents:
[
  {
  "name":"NONE"
  },
  {
  "name":"No10",
  "lat":51.5032,
  "lon":-0.1269
  },
  {
  "name":"Stone",
  "lat":51.1788,
  "lon":-1.8260
  },
  { "name":"WP0" },
  { "name":"WP1" },
  { "name":"WP2" },
  { "name":"WP3" },
  { "name":"WP4" }
]
The file contains the initial NONE waypoint which is useful if you just want to display course and speed. The next two entries are waypoints to No 10 Downing Street and to Stone Henge - obtained from Google Maps. The last five entries are entries which can be marked.
You add and delete entries using the Web IDE to load and then save the file from and to watch storage. The app itself does not limit the number of entries although it does load the entire file into RAM which will obviously limit this.
Waypoint Editor
Clicking on the download icon of gpsnav in the app loader invokes the
waypoint editor. The editor downloads and displays the current
waypoints.json file. Clicking the Edit button beside an entry
causes the entry to be deleted from the list and displayed in the
edit boxes. It can be restored - by clicking the Add waypoint
button. A new markable entry is created by using the Add name
button. The edited waypoints.json file is uploaded to the Bangle by
clicking the Upload button.
Calibration of the Compass
The Compass should be calibrated before using the App to navigate to
a waypoint (or a series of waypoints). To do this use either the
Arrow Compass or the Navigation
Compass.
Open the compass app and clicking on BTN3. The calibration process
takes 30 seconds during which you should move the watch slowly
through figures of 8. It is important that during calibration the
watch is fully rotated around each of it axes. If the app does give
the correct direction heading or is not stable with respect to tilt
and roll - redo the calibration by pressing BTN3. Calibration data
is recorded in a storage file named magnav.json.
Advantages and Disadvantages
This approach has some advantages and disadvantages. First following the arrow is fairly easy to do and once the bearing has been established it does not matter if there is not another GPS fix for a while as the compass will continue to point in the general direction. Second the GPS will only supply a course to the waypoint (a bearing) once you are travelling above 8m/s or 28kph. This is not a practical walking speed. 5kmph is considered a marching pace.
One disadvantage is that the compass is not very accurate. I have observed it being 20-30 degrees off when compared to a hiking compass. Sometime its is necessary to walk in the opposite direction for a bit to establish the correct direction to go in. The accuracy of the compass is impacted by the magnetic clamps on the charging cable, so it is particularly important that you recalibtrate the compass after the watch has been charged. That said I have found I am successfully able to follow a chain of waypoints as a route.
Possible Future Enhancements
-
Buzz when the GPS establishes its first fix.
-
Add a small LED to show the status of the GPS during the phase of establishing a first fix.
-
Add an option to calibrate the Compass without having to use the Arrow Compass or the Navigation Compass.
-
Investigate the accuracy of the Compass and how it changes throughout the day after the watch battery has been fully charged.
-
Investigate the possibility of setting the GPS in low speed mode so that a current course value can be obtained.
-
Buzz when you arrive within 20m of a waypoint to signify arrival
Acknowledgements
The majority of the code in this application is a merge of jeffmer's GPS Navigation and Compass Navigation Applications.
Written by: Hugh Barney For support and discussion please post in the Bangle JS Forum